
Setting the time on a G-Shock GA-2100 ‘CasiOak’ is straightforward once the button functions are understood. This step-by-step guide walks through the exact process to adjust hours, minutes, date, and other settings on this popular watch model. The GA-2100 series features analog-digital dual display, making accurate timekeeping essential for both displays.
Quick Summary Table
| Setting | Button Sequence | Time Required |
|---|---|---|
| Basic Time Adjustment | Hold lower left (2 sec) → Navigate with lower right → Adjust with upper buttons | 30-60 seconds |
| Date Setting | Same as time, navigate to date fields | 20-40 seconds |
| 12/24 Hour Format | Access timekeeping mode → Navigate to format setting | 15-25 seconds |
| Daylight Saving Time | Toggle DST option in timekeeping mode | 10-20 seconds |
Understanding the GA-2100 Button Layout
Before diving into time setting, familiarizing yourself with the four buttons is crucial. The G-Shock GA-2100 has buttons positioned strategically around the case:
- Upper left button (Light): Activates the LED backlight and serves as a secondary adjustment function
- Upper right button (Mode): Cycles through different watch modes and increases values during setting
- Lower left button (Adjust): Primary button for entering setting mode when held for 2 seconds
- Lower right button (Forward): Advances through setting options and decreases values
The analog hands and digital display work independently but sync when properly configured. Most people find that understanding this dual-display system helps prevent confusion during the setting process.
Setting the Time on Your G-Shock GA-2100
The main time-setting procedure involves entering timekeeping mode and navigating through various options. This process adjusts both the digital display and analog hands simultaneously when done correctly.
Method 1: Basic Time and Date Adjustment
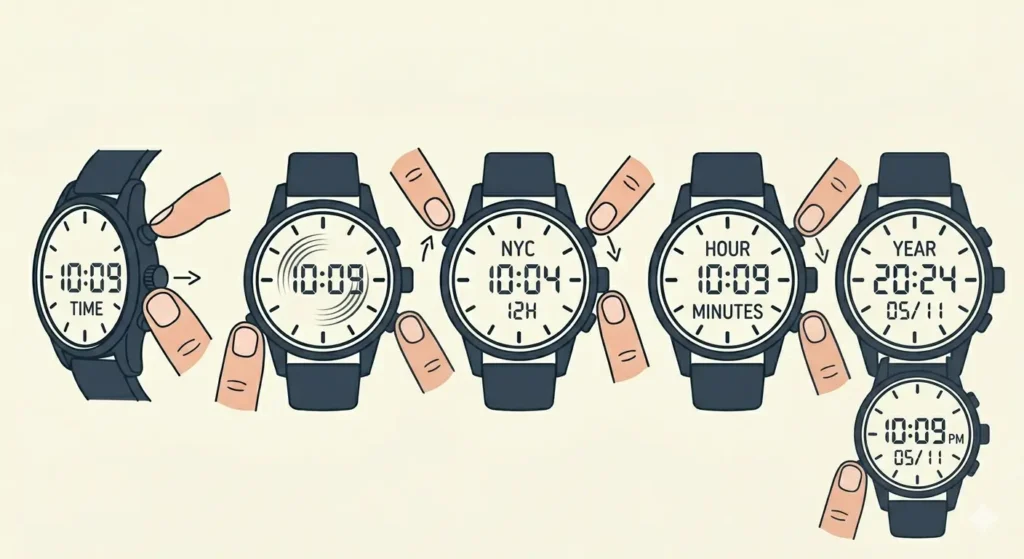
- Step 1: Press the lower right button repeatedly until the digital display shows the current time (timekeeping mode, not stopwatch or timer)
- Step 2: Hold the lower left button for approximately 2 seconds until the digital display starts flashing – this indicates setting mode is active
- Step 3: Press the lower right button to cycle through the setting options in this order: DST on/off → City code → 12/24 hour format → Seconds → Hour → Minutes → Year → Month → Day
- Step 4: When the desired setting field is flashing, use the upper right button to increase the value or the upper left button to decrease it
- Step 5: After adjusting the hour, press the lower right button to move to minutes and repeat the adjustment process
- Step 6: Continue navigating with the lower right button to set the year, month, and day using the same upper button adjustment method
- Step 7: Press the lower left button once to exit setting mode and return to normal timekeeping display
Pro Tip: When setting the seconds, press the upper right button when the correct time reaches exactly zero seconds (such as when checking against an accurate online clock). This synchronizes the watch perfectly with atomic time standards.
Method 2: Adjusting Analog Hand Position
Sometimes the analog hands become misaligned with the digital display. The GA-2100 includes a specific procedure to correct hand positioning without affecting the digital time.
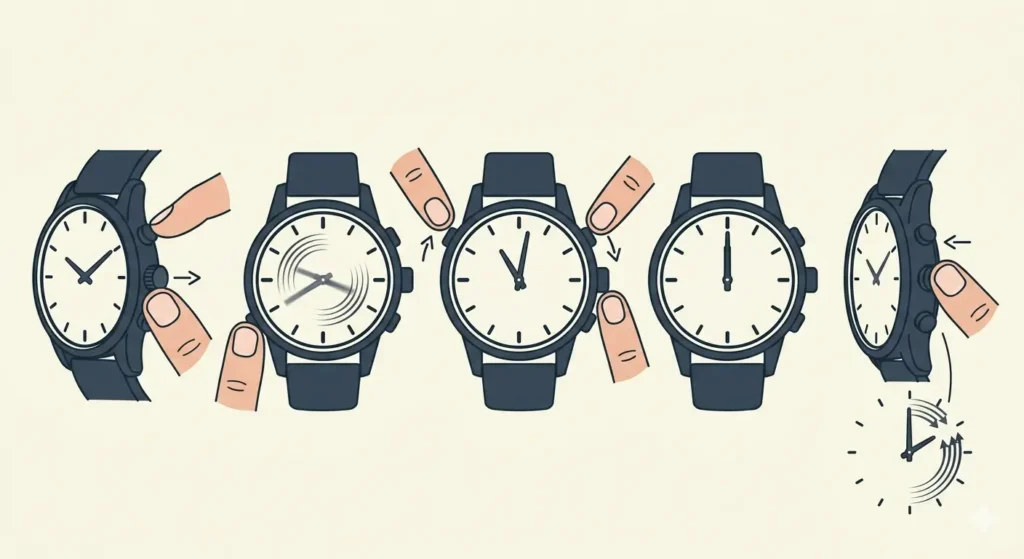
- Step 1: Pull out the crown (the small knob on the right side of the watch at the 3 o’clock position) to the first click position
- Step 2: Hold the lower left button for approximately 5 seconds until the hands move to the 12 o’clock reference position
- Step 3: Use the upper right button to move the hour and minute hands forward, or the upper left button to move them backward
- Step 4: Align both hands to point exactly at 12 o’clock (the reference position)
- Step 5: Push the crown back in to its normal position – the hands will automatically move to match the current digital time
This hand alignment feature becomes especially useful after battery replacement or if the watch experiences a strong magnetic field or impact.
Setting 12-Hour vs 24-Hour Format
The GA-2100 supports both time formats, which is particularly helpful for those who prefer military time or need to coordinate across different international time zones.
- Step 1: Enter setting mode by holding the lower left button for 2 seconds in timekeeping mode
- Step 2: Press the lower right button twice to reach the 12H/24H format setting (it will flash on the display)
- Step 3: Press the upper right button to toggle between 12-hour format (with AM/PM indicator) and 24-hour format
- Step 4: Press the lower left button to save and exit setting mode
The 24-hour format removes the AM/PM indicator and displays hours from 00:00 to 23:59. This works best when coordinating schedules across multiple time zones or in professional settings where military time is standard.
Configuring Daylight Saving Time
The DST (Daylight Saving Time) setting automatically advances or sets back the time by one hour when activated. Many regions observe DST changes twice yearly, making this feature convenient.
- Step 1: Hold the lower left button for 2 seconds to enter setting mode
- Step 2: The DST indicator (either ‘DST’ or ‘AUTO’) will flash first – this is the initial setting option
- Step 3: Press the upper right button to toggle DST on (display shows ‘DST’) or off (no DST indicator)
- Step 4: Press the lower left button to confirm and exit
When DST is activated, the watch automatically adds one hour to the displayed time. Remember to toggle this setting off when DST ends in the fall and back on when it begins in spring.
Tips for Accurate Time Setting
Achieving precision when setting the GA-2100 requires attention to small details that make a significant difference over time.
- Synchronize with atomic time: Use a reliable time source like an online time tool to ensure accuracy down to the second
- Set seconds last: Adjust hours, minutes, and date first, then set seconds at precisely zero when the reference time reaches a new minute
- Check hand alignment regularly: Every few months, verify that the analog hands match the digital display exactly at 12:00:00
- Account for time zones: When traveling, adjust the city code setting rather than manually changing hours to maintain accurate date advancement
- Avoid rapid button pressing: The watch responds better to deliberate, individual button presses rather than rapid-fire clicking
- Verify AM/PM in 12-hour mode: Double-check the AM/PM indicator after setting to prevent 12-hour errors
Pro Tip: The GA-2100 stores all settings even when the battery runs low. However, after battery replacement, always verify both digital time and analog hand alignment to ensure everything synced correctly during the power restoration.
Common Problems and Solutions
Even with straightforward instructions, certain issues occasionally arise when setting the GA-2100. The key is to identify the specific problem and apply the targeted solution.
Fix 1: Digital Display Shows Wrong Time After Setting
This typically occurs when exiting setting mode incorrectly or accidentally adjusting the wrong field.
- Re-enter setting mode and carefully navigate to the hour and minute settings
- Verify that the 12H/24H format is set correctly (an AM/PM mistake can cause 12-hour discrepancies)
- Check the city code setting, as selecting the wrong zone shifts time by several hours
- Ensure DST is toggled appropriately for the current season
Fix 2: Analog Hands Don’t Match Digital Time
Hand misalignment happens after battery changes, strong impacts, or magnetic interference.
- Use the hand alignment procedure (Method 2 above) to reset the reference position
- Ensure the crown is pulled out to the correct position during alignment
- Check that hands are set exactly at 12 o’clock during the reference setting
- Verify the crown is pushed fully back in after alignment
Fix 3: Settings Won’t Save or Revert After Exiting
If adjustments disappear immediately after exiting setting mode, the issue usually involves the exit procedure or low battery.
- Always press the lower left button once to exit (don’t let the watch auto-exit after timeout)
- Check battery level – a dying battery can prevent settings from saving properly
- Avoid pressing multiple buttons simultaneously during the save/exit step
- If problems persist, the battery likely needs replacement
Fix 4: Buttons Become Unresponsive During Setting
Occasionally, the watch may seem frozen or unresponsive to button presses while in setting mode.
- Wait 2-3 minutes without pressing any buttons – the watch will automatically exit setting mode
- After auto-exit, try the entire process again with slower, more deliberate button presses
- Ensure buttons aren’t stuck or obstructed by dirt or debris
- Clean around button areas with a soft, slightly damp cloth if necessary
Frequently Asked Questions
How long does it take to set the time on a G-Shock GA-2100?
Setting the time typically takes 30 to 60 seconds once familiar with the button sequence. First-time users might need 2-3 minutes to navigate through all the options and understand each setting field.
Why do the analog hands on the GA-2100 sometimes show a different time than the digital display?
Hand misalignment occurs when the analog hands lose synchronization with the digital module, usually after battery replacement, strong impacts, or magnetic interference. The hand alignment procedure (pulling the crown and resetting the reference position) resolves this issue.
Can the GA-2100 automatically adjust for Daylight Saving Time?
The GA-2100 does not automatically detect DST changes. The DST setting must be manually toggled on when DST begins and off when it ends. When activated, the watch adds one hour to the displayed time.
What happens if the lower left button is held too long during time setting?
Holding the lower left button for more than 5 seconds while in normal mode may activate hand alignment mode instead of time-setting mode. If this occurs, simply push the crown back in (if it was pulled out) and try again with a shorter 2-second hold.
Does the GA-2100 need to be set to a specific city code for accurate timekeeping?
The city code determines the time zone offset from UTC. Selecting the correct city code for the current location ensures accurate time display and proper date advancement at midnight. Incorrect city codes result in hour-based time discrepancies.
How accurate is the GA-2100 timekeeping after manual setting?
The GA-2100 uses a quartz movement with typical accuracy of ±15 seconds per month under normal conditions. Setting the time precisely to an atomic time source provides the most accurate starting point, but gradual drift is normal for quartz watches.
Can the seconds be reset to zero without changing hours and minutes?
Yes, when in the seconds setting field (accessed through setting mode), pressing the upper right button resets the seconds to 00 and begins counting from zero. This allows precise synchronization with a reference time source.
Why does the watch show ‘ERR’ on the display during time setting?
The ‘ERR’ message typically indicates an invalid date combination (such as February 30th or an impossible month/day pairing). Return to the date setting fields and enter valid calendar values to clear the error.
Is it necessary to set both digital and analog time separately on the GA-2100?
No, the standard time-setting procedure adjusts both displays simultaneously. Only when hands become misaligned is the separate hand alignment procedure necessary, which corrects analog hand position without affecting digital time.
What should be done if the watch gains or loses time rapidly after setting?
Rapid time gain or loss (more than several minutes per day) indicates a failing battery or internal module issue. Replace the battery first, as low power causes erratic timekeeping. If problems persist with a fresh battery, professional service may be required.