Pairing a watch strap with your watch is a simple process that can completely transform the look of your timepiece. Whether replacing a worn band or updating your style, understanding the proper technique ensures a secure fit and prevents damage to both the watch and strap.
Key Takeaways
- Matching the strap width to your watch lug width is essential for proper fitting
- Spring bar tools make strap changes easier and safer
- Most watches use 18mm, 20mm, or 22mm strap widths
- The process takes less than 5 minutes once you know the technique
- Both quick-release and traditional spring bar straps follow similar installation methods
Understanding Watch Strap Compatibility
Before pairing a strap with your watch, measure the lug width – the distance between the two lugs where the strap attaches. This measurement determines which strap size will fit properly. Most watches have the lug width marked on the case back or in the manual.
Common lug widths include 18mm, 20mm, 22mm, and 24mm. Using the wrong size results in gaps or an overly tight fit that can damage the watch case. A properly sized strap should slide into place without forcing.
Method 1: Installing Quick-Release Straps
Quick-release straps feature built-in spring bars with small levers, making installation tool-free and faster than traditional methods.
- Step 1: Hold the watch face-down on a soft cloth to protect the crystal
- Step 2: Locate the small lever on one end of the spring bar attached to the strap
- Step 3: Press the lever inward toward the center of the strap to compress the spring bar
- Step 4: While holding the lever, align the shortened spring bar with the lug holes
- Step 5: Guide one end of the spring bar into the first lug hole
- Step 6: Release the lever slowly, allowing the spring bar to extend into the opposite lug hole
- Step 7: Gently tug the strap to confirm both ends are securely seated
- Step 8: Repeat the process for the other half of the strap
Pro-Tip: Always test the security of the installation by pulling gently on the strap from different angles. A properly installed quick-release strap should not budge or shift within the lugs.
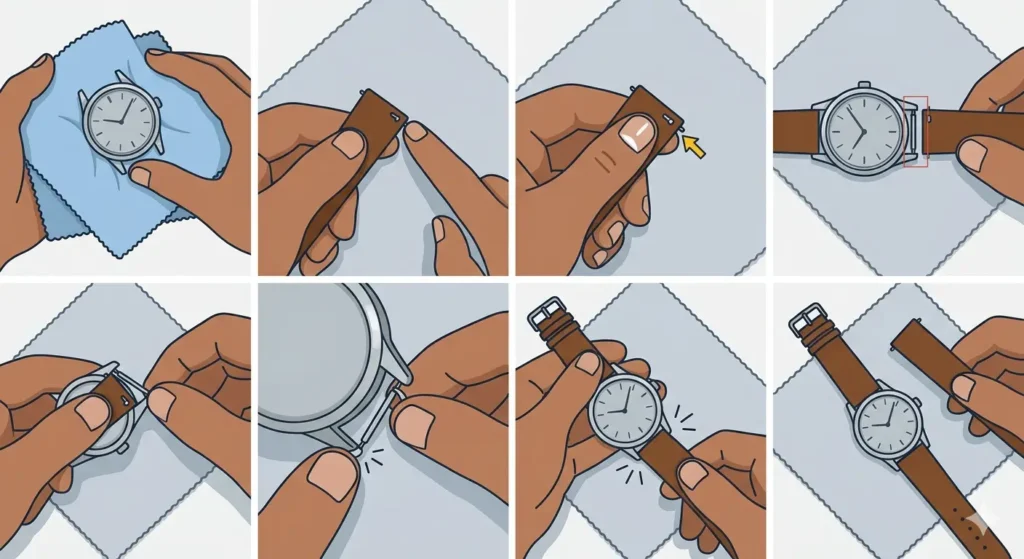
Method 2: Installing Traditional Spring Bar Straps

Traditional straps require a spring bar tool – a specialized instrument with forked or pointed ends designed to compress and position spring bars.
- Step 1: Place the watch face-down on a protected surface
- Step 2: Insert the forked end of the spring bar tool between the lug and the existing strap
- Step 3: Push the tool toward the center to compress the spring bar
- Step 4: Angle the tool to release one end of the spring bar from the lug hole
- Step 5: Remove the old strap completely
- Step 6: Take the new strap and insert the spring bar through the designated holes at each end
- Step 7: Position one end of the spring bar into a lug hole
- Step 8: Use the spring bar tool to compress the opposite end
- Step 9: Align the compressed end with the other lug hole while maintaining pressure
- Step 10: Release the tool slowly, allowing the spring bar to snap into place
- Step 11: Verify the installation by pulling on the strap to ensure it’s secure
- Step 12: Repeat for the second strap piece
Method 3: Installing NATO Straps
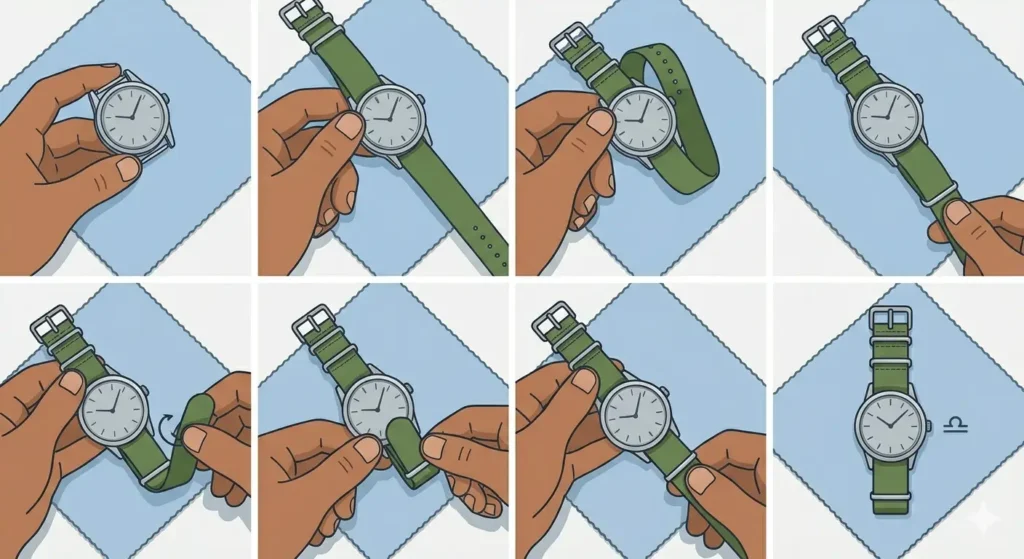
NATO straps pass underneath the watch case, creating a one-piece design that offers extra security since the watch remains attached even if a spring bar fails.
- Step 1: Keep the existing spring bars in place within the lugs
- Step 2: Thread the long end of the NATO strap between the watch case and the spring bar near the 12 o’clock position
- Step 3: Pull the strap through until the buckle section reaches the desired position
- Step 4: Thread the tail end through the bottom spring bar near the 6 o’clock position
- Step 5: Loop the tail back through the metal keepers on the strap
- Step 6: Adjust the strap length by positioning the watch case between the appropriate sections
- Step 7: Ensure the watch sits centered on the strap with equal material on both sides
Choosing the Right Strap Material
Different strap materials suit different occasions and wearing conditions. Leather straps offer classic elegance but require protection from water. Rubber and silicone straps handle moisture well, making them ideal for sports and swimming. Metal bracelets provide durability and a formal appearance, while NATO straps combine casual style with practical functionality.
The material choice affects comfort during extended wear. Leather molds to the wrist over time, while rubber remains consistent. Metal bracelets can feel cold initially but warm quickly. Consider the climate and typical wearing conditions when selecting strap material.
When planning activities that require precise time tracking across different zones, having a comfortable strap ensures the watch stays in place throughout the day.
Adjusting Strap Length for Proper Fit
A properly fitted watch strap should allow one finger to slide underneath comfortably. Too tight restricts circulation and causes discomfort, while too loose allows the watch to slide and rotate on the wrist.
For leather and fabric straps, use the buckle holes to adjust length. The watch should sit on the flat area of the wrist, not sliding toward the hand or up the forearm. When timing activities with an online stopwatch, a secure fit prevents the watch from shifting during movement.
Metal bracelets require link removal for sizing. This process typically needs professional tools, though some bracelets feature tool-free adjustment systems with push-button releases.
Tips for Successful Strap Pairing
Working over a soft surface prevents scratches if the watch or tools slip during installation. A microfiber cloth or watch mat provides adequate protection for the crystal and case.
Natural lighting helps identify lug holes and properly position spring bars. Attempting strap changes in dim conditions increases the risk of missing holes or scratching the case.
Keep spare spring bars on hand, as these small components can fall and become lost easily. Having extras prevents frustration mid-installation.
Matching strap width exactly to lug width ensures proper fit. Even a 1mm difference can result in gaps or excessive pressure on the lugs.
Clean the lug area before installing a new strap. Dirt and debris can prevent spring bars from seating properly or scratch the case during installation.
Pro-Tip: When removing or installing spring bars, always push toward the center of the watch case, never outward. Pushing outward can scratch the lugs or cause the spring bar to shoot across the room if it slips.
Common Problems and Solutions
Spring Bar Won’t Stay in Place
If the spring bar keeps popping out, check that both ends are properly compressed and aligned with the lug holes. Worn spring bars lose tension and should be replaced. Ensure the spring bar length matches the lug width exactly – bars that are too short won’t reach both holes, while bars that are too long won’t compress properly.
Strap Doesn’t Fit Between Lugs
This indicates a width mismatch. Measure the lug width carefully and order the correct strap size. Forcing an oversized strap can damage the lugs or stretch the strap material permanently.
Strap Moves Side to Side
Lateral movement suggests the strap is too narrow for the lug width. Even small gaps allow shifting that can scratch the case over time. Replace with the correct width strap.
Difficulty Compressing Spring Bar
New spring bars can feel stiff initially. Apply steady pressure rather than quick jabs. If the spring bar tool slips, try positioning it at a slightly different angle. Ensure the tool tip is properly seated in the spring bar’s groove before applying pressure.
Watch Case Gets Scratched During Installation
This typically happens when the spring bar tool slips or when working at an angle. Always use the forked end of the tool rather than the pointed end when possible, as it provides better control. Work slowly and maintain proper angle alignment with the spring bar.
Frequently Asked Questions
What size watch strap do I need?
Measure the distance between the lugs where the strap attaches. This measurement, typically 18mm, 20mm, 22mm, or 24mm, determines the correct strap width. Check the watch manual or case back for specifications if uncertain.
Can I use any strap with any watch?
The strap must match the lug width of the watch. Beyond size compatibility, consider the case style – dress watches typically pair better with leather straps, while sport watches suit rubber or NATO straps. The strap attachment method must also match the watch design.
How often should I replace my watch strap?
Replace leather straps every 1-2 years with regular wear, or sooner if they show cracking, stiffness, or discoloration. Rubber straps last 2-3 years before the material degrades. Metal bracelets can last decades with proper maintenance. Replace any strap immediately if the spring bars show wear or corrosion.
Do I need special tools to change watch straps?
Quick-release straps require no tools. Traditional spring bar straps need a spring bar tool, which costs less than $10 and makes the process significantly easier and safer. While some people use small screwdrivers or other improvised tools, these risk scratching the watch case.
Can I shower with different strap materials?
Rubber, silicone, and NATO nylon straps handle water well. Leather should avoid prolonged water exposure, as moisture causes deterioration and odor. Metal bracelets tolerate water if the watch itself is water-resistant, though drying between the links prevents corrosion.
Why does my new strap feel uncomfortable?
New leather straps require a break-in period to soften and conform to the wrist shape. This process takes 1-2 weeks of regular wear. If discomfort continues, check that the strap width matches the lug size and that the length adjustment provides proper fit without being too tight.
What’s the difference between spring bars and quick-release bars?
Both types use spring tension to stay in place, but quick-release bars feature small levers that allow tool-free installation and removal. Traditional spring bars require a spring bar tool to compress them during installation. Quick-release systems offer convenience, while traditional spring bars provide a slimmer profile.
Can I reuse spring bars with a new strap?
Reuse spring bars only if they show no signs of wear, maintain strong tension, and aren’t corroded. However, spring bars are inexpensive, and using new ones with each strap change ensures maximum security. Worn spring bars risk failure, potentially resulting in a dropped watch.
How tight should a watch strap be?
The strap should allow one finger to slide underneath comfortably. The watch should stay in place on the wrist without sliding or rotating, but shouldn’t leave marks or feel constrictive. Proper fit prevents both discomfort and excessive wear on the strap material.
Will changing straps void my watch warranty?
Changing straps typically doesn’t void warranties, as it’s considered routine maintenance. However, damage caused during strap changes isn’t covered. If uncertain, consult the warranty documentation or contact the manufacturer before proceeding, especially with expensive timepieces.