Adjusting a Seiko pin and collar bracelet requires precision and the right technique to achieve a comfortable fit without damaging the links. This step-by-step guide walks through the exact process of removing or adding links using the pin and collar system found on many Seiko watch bracelets. Whether the watch feels too loose or uncomfortably tight, proper adjustment ensures all-day comfort and prevents unnecessary wear on the clasp.
Key Takeaways
- Pin and collar bracelets use small pins held in place by metal collars that must be removed in a specific direction
- Always push pins out in the direction of the arrows marked on the bracelet links
- Remove links symmetrically from both sides of the clasp to maintain balance
- Essential tools include a pin pusher, hammer, and collar removal tool or small screwdriver
- Most Seiko bracelets require removing 1-3 links per side for proper sizing
Tools Needed for Bracelet Adjustment
Before starting the adjustment process, gather these essential tools to complete the task efficiently:
- Pin pusher tool or small hammer and punch set
- Collar removal tool or precision flathead screwdriver
- Soft cloth or watch holder to protect the watch case
- Small container to store removed pins and collars
- Needle-nose pliers for reinserting pins
Quality tools make the difference between a smooth adjustment and potential damage to the bracelet. The pin pusher should have a fine tip that fits the pin diameter precisely. A dedicated timing tool can help track work sessions when adjusting multiple watches.
Method 1: Removing Links from the Bracelet
Identifying Removable Links
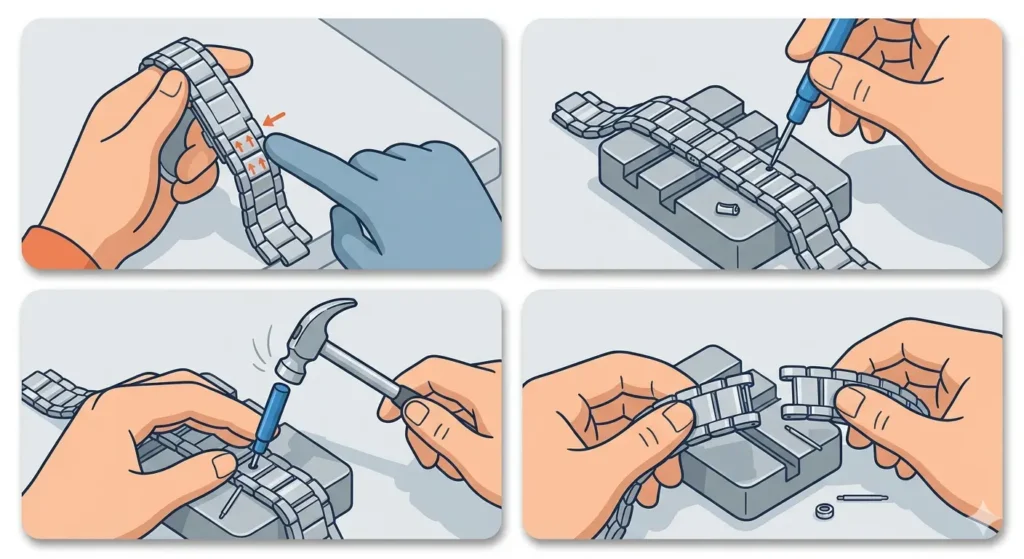
Seiko pin and collar bracelets feature removable links marked with small arrows on the inner side of the bracelet. These arrows indicate the direction to push the pins for removal. Not all links are removable—solid links without arrows cannot be adjusted and serve as structural components.
Examine the bracelet carefully under good lighting. The removable links typically sit on either side of the clasp, allowing symmetrical adjustment. Count how many links need removal by trying the watch on and estimating excess length.
Removing the Collar
- Step 1: Place the watch face-down on a soft cloth to prevent scratches during the adjustment process
- Step 2: Locate the small metal collar on the side of the link where the arrow points away from
- Step 3: Insert the collar removal tool or small flathead screwdriver into the gap between the collar and the link
- Step 4: Gently pry the collar out by applying steady pressure—the collar should pop out without excessive force
- Step 5: Place the removed collar immediately into the storage container to prevent loss
Pro-Tip: The collar is a tiny component that easily rolls away when removed. Always work over a clean, organized surface with raised edges to catch any dropped parts. Some watchmakers place a white towel in a shallow tray to create a contained workspace where small parts remain visible and retrievable.
Pushing Out the Pin
- Step 1: Position the pin pusher tool or punch directly on the pin head, ensuring alignment with the arrow direction
- Step 2: Apply firm, controlled pressure or light taps with a hammer to push the pin through the link
- Step 3: Continue pushing until the pin emerges from the opposite side of the link
- Step 4: Use needle-nose pliers to pull the pin completely free once enough length protrudes
- Step 5: Store the pin with its corresponding collar in the container
The pin should slide through with moderate resistance. Excessive force indicates misalignment or pushing against the arrow direction. Never force a stuck pin, as this can damage the link or bend the pin.
Separating the Link
Once the pin is removed, the link separates freely from the bracelet. Repeat this process for additional links as needed, always maintaining symmetry. For example, removing two links total means taking one from each side of the clasp.
Set removed links aside in a safe location. These links may be needed later if wrist size changes or when selling the watch, as complete bracelet sets maintain resale value.
Method 2: Reassembling the Bracelet
Aligning the Links
- Step 1: Hold the two bracelet sections that need connection, ensuring the pin holes align perfectly
- Step 2: Position the links so the arrow direction matches the original configuration
- Step 3: Insert the pin from the correct direction (following the arrow) until it starts threading through both links
- Step 4: Use the pin pusher to drive the pin through until it sits flush on both sides
Proper alignment prevents cross-threading and ensures the pin passes through smoothly. The links should move freely once connected but without excessive play.
Securing with the Collar
- Step 1: Verify the pin sits completely flush and does not protrude from either side of the link
- Step 2: Position the collar over the pin end opposite the arrow direction
- Step 3: Press the collar firmly into place using a pin pusher or the flat side of pliers
- Step 4: Ensure the collar seats fully into the groove—it should sit flush with the link surface
- Step 5: Test the connection by gently flexing the bracelet to confirm the collar holds securely
A properly installed collar creates a nearly invisible connection. The collar should not spin or move once seated. Any movement indicates incomplete installation and requires reseating.
Testing the Fit
After reassembly, try the watch on to verify proper sizing. The bracelet should rest comfortably on the wrist with minimal movement. A well-fitted watch bracelet allows one finger to slide between the band and wrist without forcing.
Check the fit at different times of day, as wrist size fluctuates with temperature and activity. The watch should not slide more than one inch up or down the wrist during normal movement. When planning timing coordination across different locations, a properly fitted watch becomes essential for quick reference.
If the fit feels incorrect, repeat the adjustment process. Most adjustments require fine-tuning to achieve the perfect balance between security and comfort.
Tips for Successful Bracelet Adjustment
- Work in a well-lit area with a magnifying glass if needed to see small components clearly
- Keep the watch manual nearby for model-specific guidance on removable link locations
- Mark removed links with tape indicating which side they came from for easier reassembly
- Apply a tiny drop of case back opener compound to stubborn collars to improve grip
- Consider removing half-links first if the bracelet offers this option for finer adjustment
- Clean the bracelet thoroughly after adjustment to remove oils and debris from the process
- Store extra links in the original watch box or a labeled plastic bag
- Use a reliable time reference to ensure the watch remains accurate after adjustment
Common Problems and Solutions
Fix 1: Collar Won’t Budge
Stubborn collars often result from factory installation pressure or years of wear creating a tight fit. Apply gentle heat using a hairdryer for 30 seconds to expand the metal slightly. The warmth makes removal easier without damaging the bracelet. Alternatively, use penetrating oil specifically designed for watch components, allowing it to sit for five minutes before attempting removal again.
Fix 2: Pin Bent During Removal
Bent pins occur when excessive force or misalignment happens during removal. If a pin bends, carefully straighten it using needle-nose pliers before reinsertion. Roll the pin on a flat surface to check for straightness—any wobble indicates the pin remains bent and should not be reused. Keep spare pins in the toolkit for these situations, as replacement pins cost less than damaged links.
Fix 3: Collar Keeps Popping Out
A collar that refuses to stay seated indicates either a worn collar, damaged pin, or incorrect installation angle. Inspect the collar groove for debris or deformation. Clean thoroughly and attempt reinstallation, ensuring the collar enters straight rather than at an angle. If problems persist, the collar may need replacement—contact Seiko or an authorized dealer for genuine replacement collars.
Fix 4: Links Feel Loose After Reassembly
Loose links suggest the pin did not fully seat or the collar failed to engage properly. Disassemble the connection and inspect the pin length—it should extend completely through both link halves. Push the pin further until resistance indicates full seating, then reinstall the collar with increased pressure to ensure complete engagement.
Frequently Asked Questions
How many links should be removed from a Seiko bracelet?
The number of links to remove depends entirely on wrist size, but most adjustments involve removing 1-3 links per side. Measure wrist circumference and compare it to the current bracelet length to determine exact needs. Always remove links symmetrically from both sides of the clasp to maintain proper weight distribution and appearance.
Can links be removed from any part of the bracelet?
No, only links marked with directional arrows can be safely removed. These removable links typically cluster near the clasp area on both sides. Solid links without arrows serve structural purposes and should never be disassembled. Removing non-designated links can compromise bracelet integrity and void warranties.
What happens if the pin is pushed in the wrong direction?
Pushing pins against the arrow direction can damage the collar groove or deform the pin, making removal extremely difficult. If this occurs, stop immediately and attempt pushing from the correct direction. Forcing a pin backward may permanently damage the link, requiring professional repair or link replacement.
How tight should a Seiko bracelet fit?
The bracelet should fit snugly without restricting blood flow or causing discomfort. A proper fit allows one finger to slide between the bracelet and wrist. The watch should stay relatively stable on the wrist without sliding more than an inch during normal movement. Slightly looser fits work better for hot weather when wrists expand.
Are special tools absolutely necessary for this adjustment?
While professional tools make the process easier and safer, careful adjustment is possible with household items in emergency situations. A small nail or thumbtack can substitute for a pin pusher, and a precision flathead screwdriver works for collar removal. However, proper tools significantly reduce the risk of damage and make the process more efficient.
Can Seiko bracelets be adjusted by watch shops?
Yes, most watch repair shops and jewelry stores offer bracelet sizing services for a small fee, typically between $10-25. This option provides peace of mind for those uncomfortable working with small components or lacking proper tools. Authorized Seiko dealers often include free sizing with watch purchases.
How do half-links differ from full links in adjustment?
Half-links measure approximately half the length of standard links and provide finer adjustment increments. Not all Seiko bracelets include half-links, but when present, they offer better sizing precision. Half-links use the same pin and collar system but require careful identification to avoid confusion during adjustment.
What should be done with removed links?
Store removed links in the original watch box or a labeled container for future use. Wrist size can change due to weight fluctuations, temperature, or medical conditions. Keeping extra links maintains the watch value and provides flexibility for future adjustments. Some buyers specifically request complete bracelet sets when purchasing pre-owned watches.
Why does the bracelet feel different after adjustment?
Newly adjusted bracelets require a brief break-in period as the links settle into their new configuration. The bracelet may feel slightly stiff for the first few days as oils distribute and components align. This sensation normalizes within a week of regular wear. If discomfort persists beyond this period, recheck the fit and adjust as needed.
Can damaged collars be replaced individually?
Yes, Seiko sells replacement collars and pins through authorized service centers and some third-party watch parts suppliers. When ordering replacements, provide the exact watch model number to ensure correct sizing. Collar dimensions vary between bracelet models, and using incorrect sizes leads to poor fit and potential link failure.