Learning how to size and wear a NATO strap properly transforms the entire watch-wearing experience. NATO straps offer versatility, durability, and style – but only when fitted and worn correctly. This comprehensive guide covers everything needed to master NATO strap sizing and five distinct wearing methods that suit different preferences and occasions.
Key Takeaways
- NATO straps typically come in 18mm, 20mm, 22mm, and 24mm widths – measure the watch lug width accurately before purchasing
- The single-pass method offers the slimmest profile, while the traditional NATO provides maximum security
- Proper sizing means the strap should allow one finger to slide comfortably between the strap and wrist
- Different wearing styles suit different activities – from casual daily wear to sports and formal occasions
- Quality NATO straps feature reinforced stitching, sturdy hardware, and dense nylon weave
Understanding NATO Strap Sizing
Getting the right size starts with measuring the watch lug width. This measurement determines which strap width fits the timepiece properly.
Measuring Watch Lug Width
Step 1: Remove any existing strap from the watch
Step 2: Use a digital caliper or ruler to measure the distance between the lugs where the strap attaches
Step 3: Measure in millimeters for accuracy – common sizes include 18mm, 20mm, 22mm, and 24mm
Step 4: Round to the nearest standard size if the measurement falls between sizes
Determining Strap Length
NATO straps come in standard lengths, typically around 280mm total length. This fits most wrist sizes from 6 to 8 inches. For smaller wrists (under 6 inches) or larger wrists (over 8 inches), specialty short or long NATO straps are available.
The ideal fit allows the strap to wrap comfortably around the wrist with enough tail remaining to tuck into the keepers. Too much excess creates bulk, while too little prevents proper securing.
Pro Tip: When ordering online, check if the retailer offers free exchanges. NATO strap sizing can be tricky the first time, and having the option to swap for a different length ensures getting the perfect fit without financial risk.
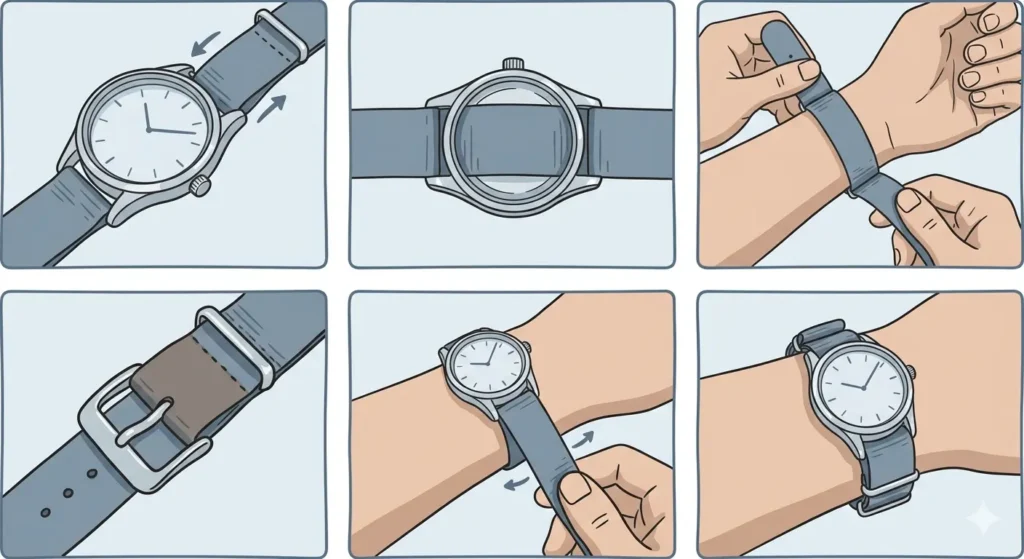
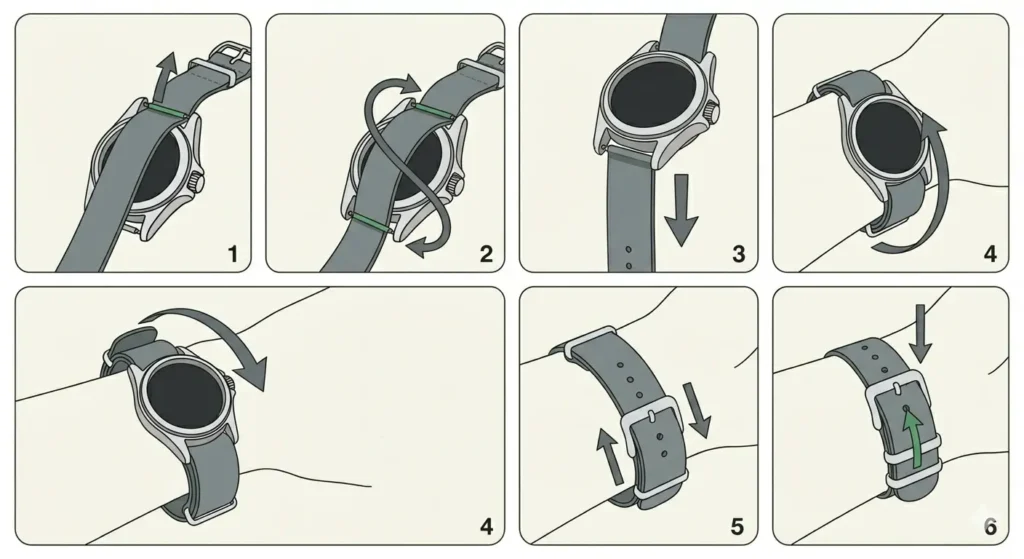
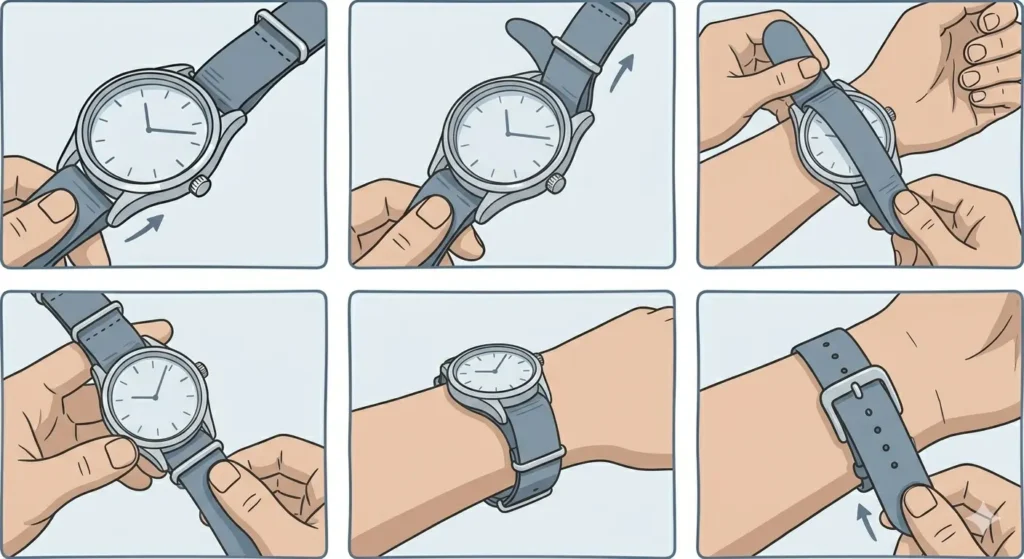
Method 1: Traditional NATO Strap Style
The traditional NATO method provides maximum security with the strap passing under the watch case, creating a safety layer if a spring bar fails.
Step 1: Thread the long end of the strap through the spring bar closest to the 12 o’clock position
Step 2: Pull the strap through until the buckle section sits on top of the wrist
Step 3: Thread the long tail under the watch case and through the second spring bar at the 6 o’clock position
Step 4: Bring the tail back over the watch case
Step 5: Thread through the first keeper loop near the buckle
Step 6: Insert the tail through the appropriate buckle hole for wrist size
Step 7: Pull tight and secure the excess tail through the second keeper loop
This classic method works perfectly for active situations or when peace of mind matters most. The extra layer of nylon between the watch and wrist provides cushioning and prevents metal case backs from touching skin.
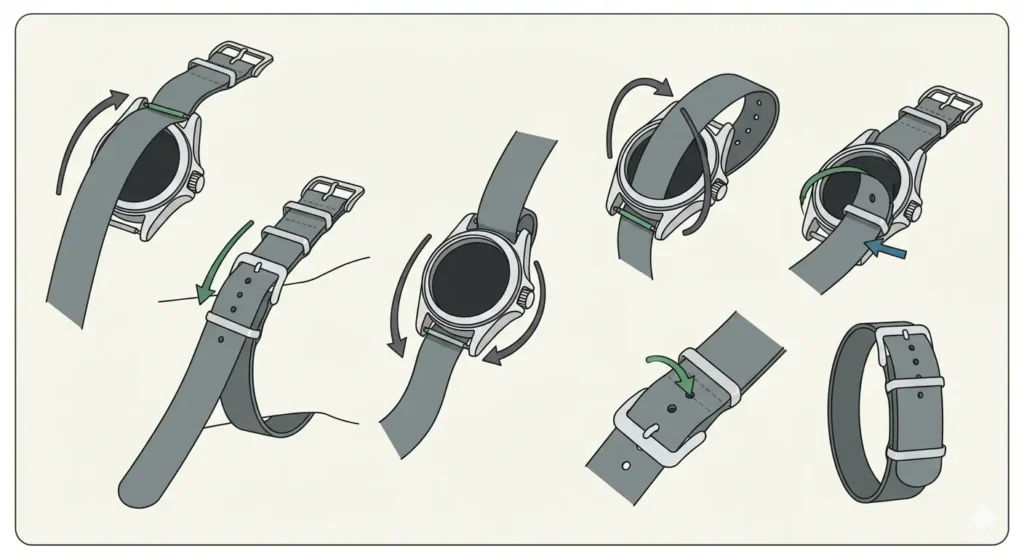
Method 2: Single-Pass Style
The single-pass approach offers a slimmer profile by eliminating the extra layer of fabric under the watch case.
Step 1: Thread the strap through both spring bars from the 12 o’clock side
Step 2: Center the watch on the strap so equal length appears on both sides
Step 3: Wrap both ends around the wrist
Step 4: Thread the tail end through the buckle
Step 5: Adjust to the desired tightness
Step 6: Secure the excess through the keeper loops
This method reduces overall thickness, making it ideal for dress watches or situations where a lower profile is preferred. The watch sits closer to the wrist, creating a more refined appearance.
Method 3: Hybrid Pull-Through Style
The hybrid method combines elements of both traditional and single-pass approaches, offering customizable wearing comfort.
Step 1: Thread the strap through the spring bar at 12 o’clock
Step 2: Loop back and thread through the 6 o’clock spring bar
Step 3: Instead of bringing the tail back over, leave it hanging at 6 o’clock
Step 4: Wrap the buckle side around the wrist
Step 5: Connect both ends at the side or bottom of the wrist
Step 6: Buckle and secure as normal
This style positions the buckle hardware away from the top of the wrist, preventing discomfort when bending the hand backward. Many find this timing method ideal for sports activities where wrist flexibility matters.
Method 4: Reverse NATO Style
The reverse NATO flips the traditional orientation, placing the buckle on the underside of the wrist.
Step 1: Start by threading from the 6 o’clock position instead of 12 o’clock
Step 2: Pull the strap under the case and through the 12 o’clock spring bar
Step 3: Bring the tail back down over the watch face
Step 4: Thread through the keepers
Step 5: Wrap around the wrist with the buckle facing down
Step 6: Secure through the buckle holes
This configuration keeps hardware away from desk surfaces during typing or writing, reducing wear on both the strap and furniture. It also prevents the buckle from catching on sleeves.
Method 5: Minimalist Tuck Style

The minimalist approach focuses on clean aesthetics by carefully managing excess strap length.
Step 1: Use any of the above threading methods
Step 2: After buckling, measure the excess tail length
Step 3: Fold the excess back on itself
Step 4: Tuck the folded section completely through both keeper loops
Step 5: Adjust so the fold sits flush against the wrist
Step 6: Ensure no loose ends protrude
This method creates the cleanest look, especially important for formal settings or when wearing the watch under a shirt cuff. The tucked tail prevents snagging and maintains a streamlined appearance throughout the day.
Pro Tip: For those who frequently check different time zones, the minimalist tuck style keeps the watch face easily accessible while maintaining a professional appearance during international calls or meetings.
Tips for Perfect NATO Strap Wear
Break-In Period
New NATO straps often feel stiff initially. Wearing the strap regularly for a week softens the nylon and molds it to wrist shape. Some prefer to soak new straps in warm water for 10 minutes, then wear them until dry to accelerate this process.
Seasonal Adjustments
Wrists naturally swell in heat and shrink in cold. Adjust the strap one hole looser during summer months or after exercise. In winter or air-conditioned environments, tighten by one hole to prevent the watch from sliding.
Hardware Maintenance
Check the spring bars monthly to ensure they remain secure. The constant threading and unthreading of NATO straps can gradually loosen spring bars. Replace any that show signs of wear or reduced tension.
Strap Positioning
Position the watch face slightly toward the outside of the wrist bone rather than directly on top. This placement improves comfort and makes checking the time more natural, especially when using digital clock tools alongside traditional timepieces.
Color Coordination
Match NATO strap colors to regular wardrobe choices. Navy blue and grey work universally, while bold colors like red or orange suit casual settings. Keep multiple straps to swap based on the occasion – changing takes less than a minute.
Keeper Loop Tension
The keeper loops should hold the excess strap firmly without being impossibly tight. If the loops are too loose, the tail flops around. If too tight, threading becomes frustrating. Quality NATO straps balance this perfectly.
Common Problems and Solutions
Strap Too Long
When excessive tail length creates bulk, fold the tail twice before securing through the keepers. Alternatively, visit a cobbler or leather worker who can trim the strap and seal the end with a lighter to prevent fraying.
Strap Slipping
If the watch slides around the wrist despite proper tightness, the strap may be too worn or the weave too loose. Replace with a strap featuring denser nylon weaving. Premium NATO straps use tighter weaves that grip better.
Buckle Irritation
Metal buckles sometimes irritate sensitive skin. Switch to wearing methods that position the buckle on the wrist side or underside. Some manufacturers offer PVD-coated buckles that reduce allergic reactions.
Keeper Loops Breaking
Repeated threading wears out keeper loops over time. Replace the entire strap when loops show signs of tearing. Attempting to repair rarely works long-term since the nylon has weakened throughout.
Watch Case Scratching
The metal hardware on NATO straps can scratch polished watch cases during installation. Place a microfiber cloth under the watch when threading the strap, or use NATO straps with rounded hardware edges designed to minimize scratching.
Uneven Wear Patterns
Straps develop wear patterns based on regular threading routes. Rotate between different wearing methods to distribute stress across the entire strap length, significantly extending overall lifespan.
Frequently Asked Questions
How tight should a NATO strap be worn?
The strap should fit snugly enough that the watch does not rotate around the wrist, but loose enough to slide one finger between the strap and skin comfortably. This allows proper circulation while keeping the watch secure during movement.
Can NATO straps damage spring bars?
NATO straps themselves do not damage spring bars, but frequent strap changes can weaken them over time. Inspect spring bars regularly and replace them every 12-18 months or immediately if any bending or reduced tension is noticed.
What is the difference between NATO and Zulu straps?
NATO straps feature thin nylon with smaller hardware and sewn keepers, while Zulu straps use thicker nylon, larger rounded hardware, and usually have heavier-duty construction. Zulus also typically have only one thick keeper instead of two thin ones.
How often should NATO straps be washed?
Wash NATO straps every 2-4 weeks depending on activity level. Remove the watch and hand wash the strap with mild soap and warm water, then air dry completely before reinstalling. This prevents odor buildup and maintains the fabric integrity.
Do NATO straps fit all watch sizes?
NATO straps come in various widths (18mm, 20mm, 22mm, 24mm) to match different watch lug widths. The strap width must match the lug width exactly for proper fit. Length-wise, standard NATOs fit wrists from 6 to 8 inches, with specialty sizes available for smaller or larger wrists.
Why does the watch sit higher with NATO straps?
Traditional NATO strap installation adds an extra layer of nylon under the watch case, raising it slightly from the wrist. Using the single-pass method eliminates this extra layer, allowing the watch to sit lower and closer to the wrist surface.
Can leather NATO straps be worn the same way?
Leather NATO straps follow the same threading principles but offer less flexibility than nylon. They require a break-in period and do not work as well for the traditional double-pass method due to increased thickness. Single-pass works best for leather NATOs.
What makes a high-quality NATO strap?
Quality NATO straps feature dense nylon weaving (typically seatbelt-grade), reinforced stitching at stress points, brushed or polished stainless steel hardware, and precise keeper loop sizing. The weave should feel substantial without being overly thick or stiff.
How do NATO straps compare to other strap types for comfort?
NATO straps excel in breathability and lightweight comfort compared to leather or rubber. The nylon weave allows air circulation, reducing sweat buildup. However, they lack the premium feel of leather or the waterproof properties of rubber for swimming.
Can NATO straps be shortened permanently?
NATO straps can be trimmed to custom lengths using sharp scissors, then the cut end should be sealed with a lighter to prevent fraying. Cut conservatively – remove small amounts at a time since the process cannot be reversed. Always leave enough length for the tail to pass through both keepers.