Understanding how to change time format in Windows is essential for users who work across different regions, need to match specific formatting standards, or simply prefer a different way of displaying time. Whether you need to switch between 12-hour and 24-hour formats, adjust date displays, or customize regional settings, Windows provides flexible options to meet your needs. This comprehensive guide walks you through every method to change time format in Windows, ensuring your system displays time exactly as you prefer.
Method 1: Change Time Format Through Quick Settings
This is the fastest way to change the time format directly from your desktop in Windows 11.
Watch This: Step-by-Step Guide to Change Time Format in Windows Through Quick Settings
Step-by-Step Instructions
Step 1: Right-click the time or date in the bottom-right corner of your screen.
Step 2: Select Adjust date and time.

Step 3: Click Change the date and time format.
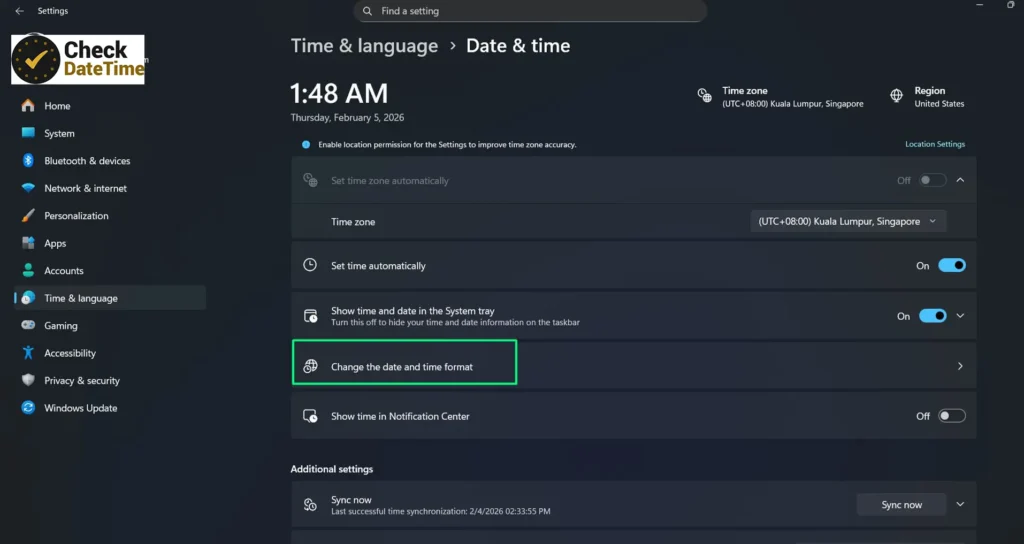
Step 4: In the format options, locate Short time, then choose your preferred display style.
- Standard 12-hour format (no leading zero)
- 24-hour format (no leading zero)
- 24-hour format with leading zeros
Windows will automatically apply the changes across your system.
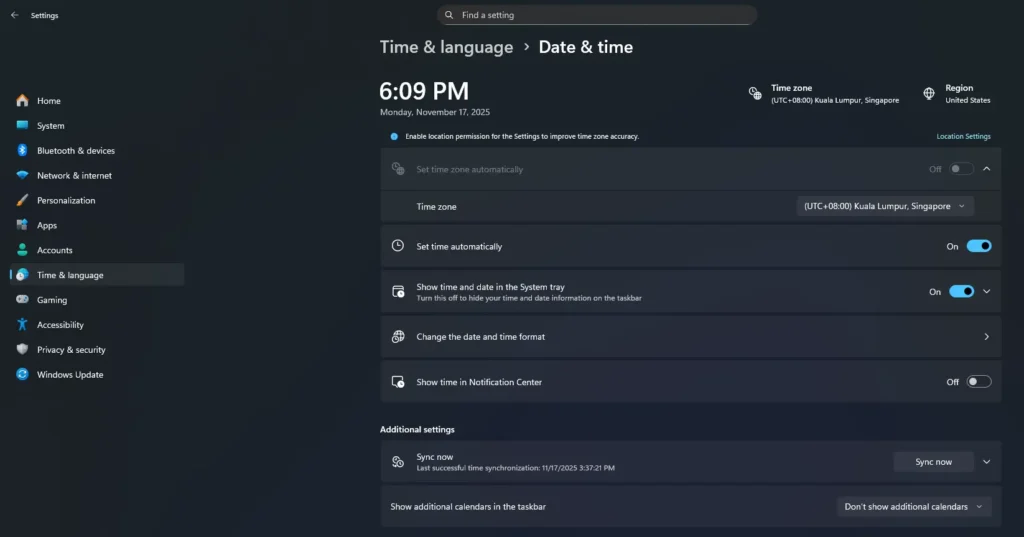
Method 2: Change Time Format Through Windows Settings
Another reliable way to change the time format in Windows 11 is through the Settings application. This approach is simple, requires no technical expertise, and only takes a few minutes to complete.
Watch This: Easily Change Time Format Through Windows Settings
Step-by-Step Instructions for Windows 11
Step 1:
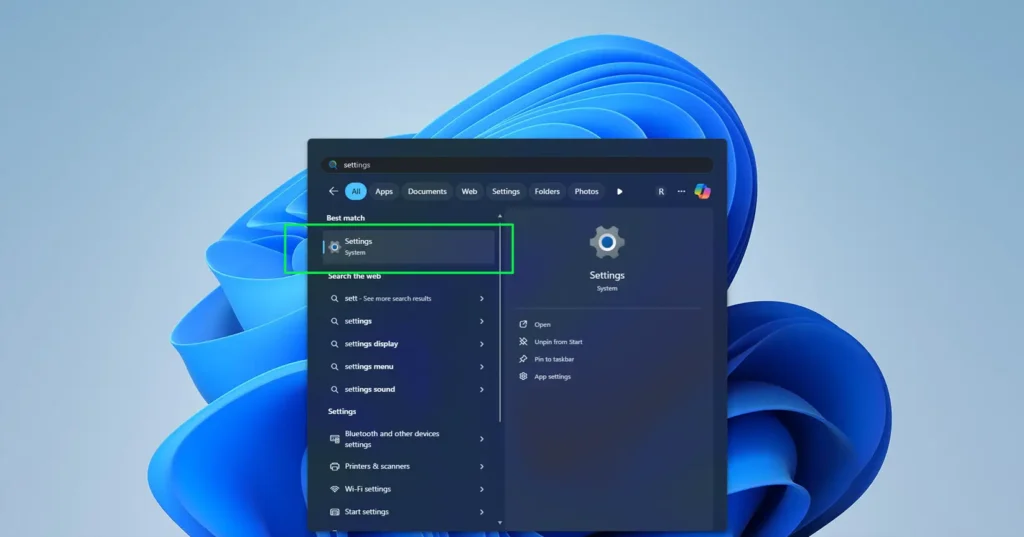
Open Settings by pressing Windows key + I or selecting it from the Start menu.
Step 2:
Go to Time & language and click Date & time.
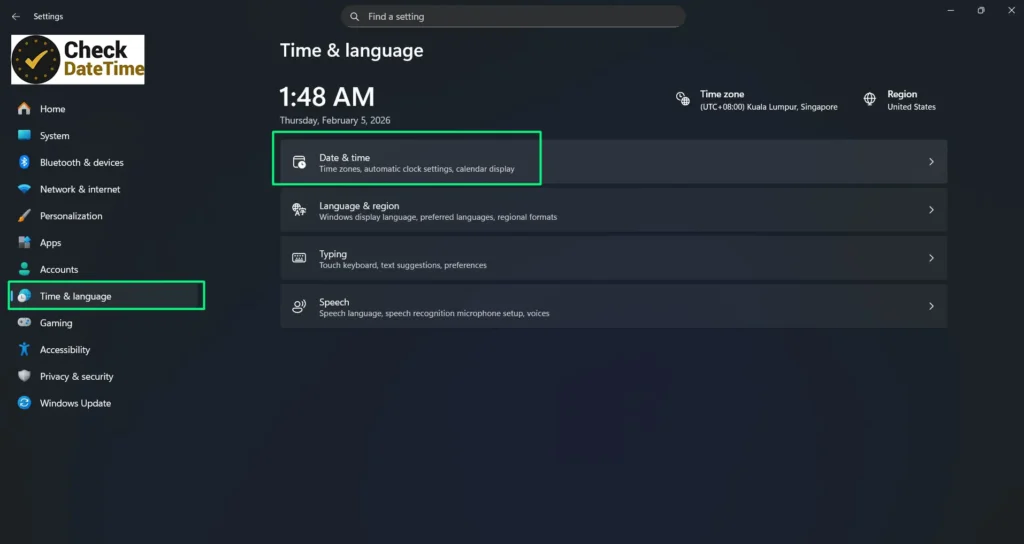
Step 3:
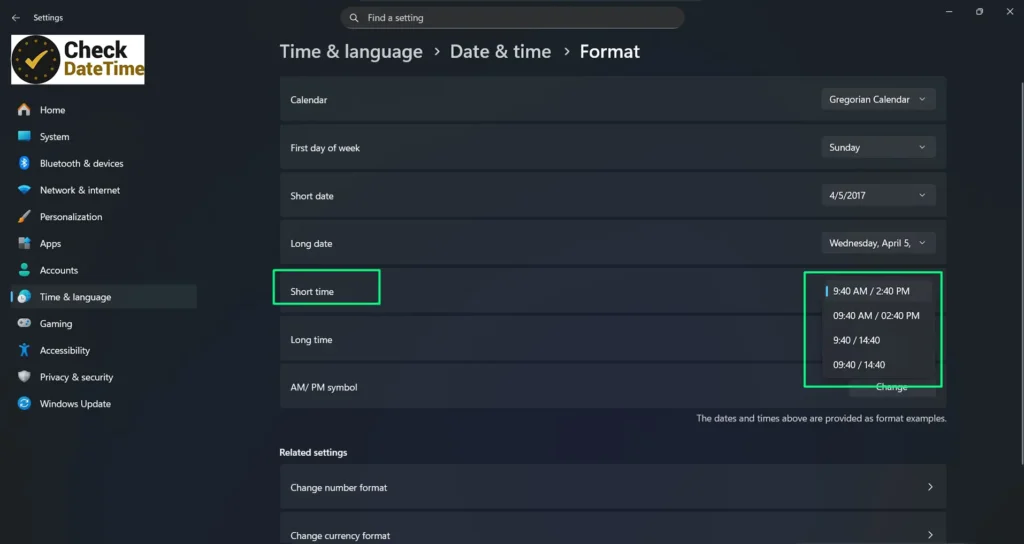
Select Change the date and time format.
Step 4:
In the format options, locate Short time, then choose your preferred display style:
- Standard 12-hour format (no leading zero)
- 24-hour format (no leading zero)
- 24-hour format with leading zeros
Step 5:
Your system will automatically apply the selected time format across Windows. No restart is required.
Windows 10 Time Format Settings
For Windows 10 users, the process is similar but with slightly different navigation. Open Settings and go to Time & Language, then click on Region in the left panel. Under Regional Format, click Additional Date, Time & Regional Settings. This opens the classic Control Panel interface where you can make detailed adjustments. Click Change Date, Time, or Number Formats, then navigate to the Formats tab where you can customize both short and long time formats using the dropdown menus provided.
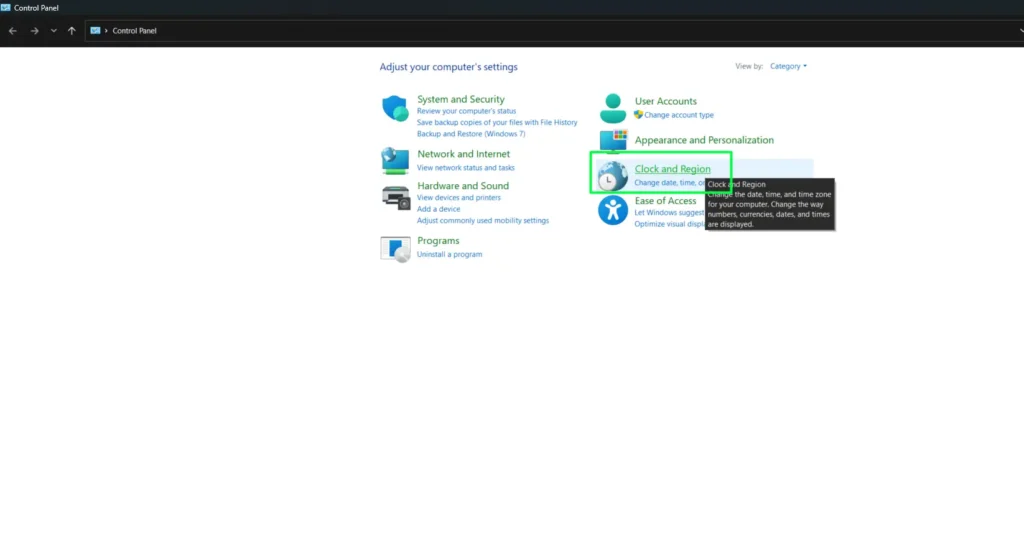
Method 3: Using Control Panel for Advanced Time Format Customization
The Control Panel method offers more granular control over time format settings and works across all Windows versions. This approach is particularly useful when you need to create custom time formats beyond the standard options.
Step 1:
Open the Control Panel by typing control panel in the Windows search box and selecting it.

Step 2:
Click Clock and Region, then select Region.
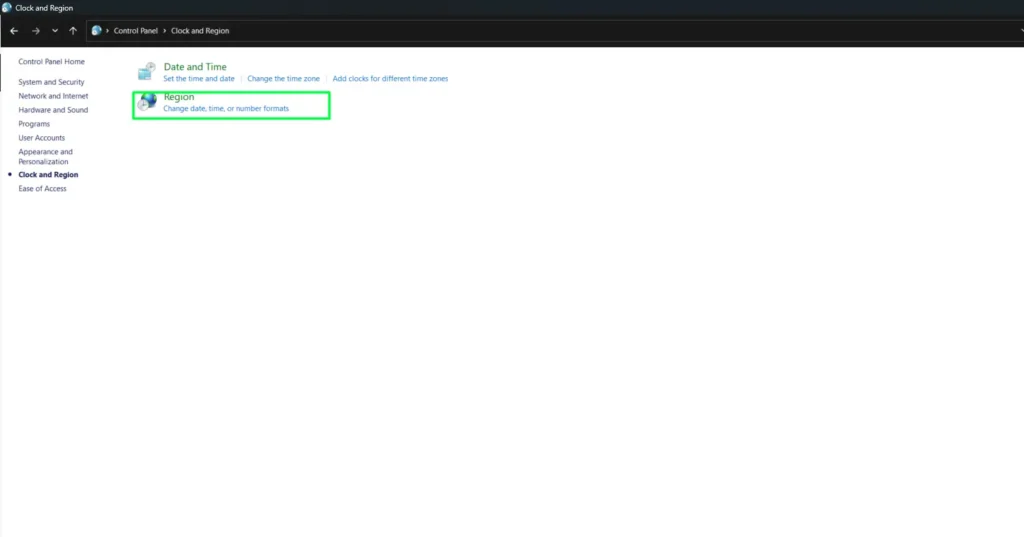
Step 3:
In the Region dialog box, go to the Formats tab to view your current date and time format settings.

Step 4:
Use the dropdown menus to change formats, or click Additional Settings for advanced customization options.
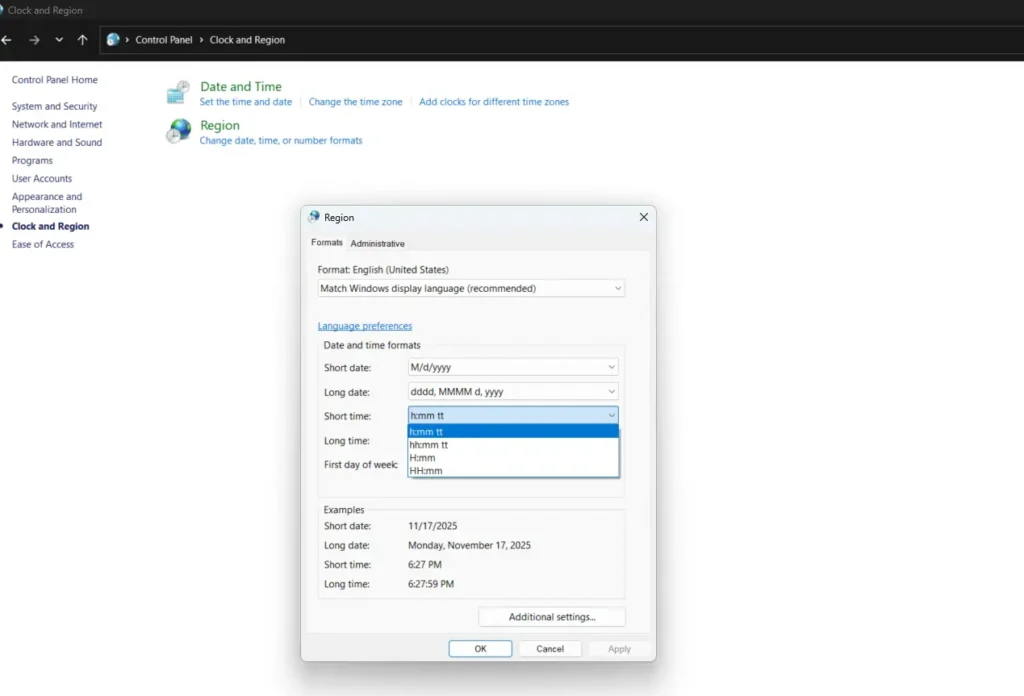
Creating Custom Time Formats
The Additional Settings button opens a detailed customization window where you can define exactly how time displays on your system. In the Time tab, you’ll find fields for Time Format (Short) and Time Format (Long). These fields use specific notation: H represents hours in 24-hour format, h represents hours in 12-hour format, mm represents minutes, ss represents seconds, and tt represents AM/PM designator.
For example, entering “HH:mm:ss” creates a 24-hour format with seconds, while “h:mm tt” creates a 12-hour format with AM/PM. You can add separators like colons, periods, or spaces according to your preference. This level of customization proves invaluable for users who need to match specific organizational or international standards.
Why Change Time Format in Windows?
Different regions and industries have varying standards for displaying time and dates. The United States commonly uses the 12-hour AM/PM format, while most European and Asian countries prefer the 24-hour military time format. Professionals in healthcare, aviation, military, and international business often require specific time formats for consistency and clarity. Additionally, personal preference plays a significant role—some users find 24-hour format more straightforward, while others prefer the traditional 12-hour clock. By customizing your Windows time format, you ensure that your computer displays information in the most intuitive way for your needs.
Understanding Time Format Notation
Windows uses specific characters to represent different time components. Understanding this notation helps you create custom formats that perfectly match your requirements. Single H or h displays hours without leading zeros (1, 2, 12), while double HH or hh displays hours with leading zeros (01, 02, 12). The same principle applies to minutes and seconds with m/mm and s/ss respectively.
The AM/PM designator can be displayed using t for single character (A or P) or tt for two characters (AM or PM). Some users prefer lowercase (am/pm), which can be achieved in certain customization scenarios. Separators between time components can be colons, periods, commas, or spaces depending on regional conventions and personal preference.
Changing Time Format for Specific Applications
While system-wide changes affect most applications, some programs maintain their own time format settings. Microsoft Office applications, for instance, may require separate formatting adjustments within each program. Email clients like Outlook have independent time display settings found in their respective options or preferences menus.
Web browsers typically inherit the system time format but may also follow website-specific settings. If you notice inconsistencies in how time displays across different applications, check each program’s individual settings. Most modern applications respect Windows system settings by default, but legacy software or specialized programs may need manual configuration.
Troubleshooting Common Time Format Issues
Sometimes changes to time format don’t immediately appear across all applications. Restarting your computer ensures all system processes adopt the new settings. If specific programs still display incorrect formats, try closing and reopening them. Clearing application caches may also resolve persistent formatting issues.
Regional settings conflicts can occur when multiple language packs are installed. Verify that your primary language and region settings align correctly in the Time & Language settings. If you’ve recently updated Windows, some settings may revert to defaults—simply reapply your preferred time format following the methods outlined above.
Best Practices for Time Format Selection
When choosing a time format, consider your primary use case and audience. International collaboration benefits from 24-hour format as it eliminates AM/PM ambiguity. Professional environments often have established standards—check with your IT department or organizational guidelines before making changes to work computers.
For personal devices, select formats that feel intuitive and reduce the chance of misreading times. If you frequently reference time across different regions, using tools like CheckDateTime.com for current local times around the world helps you stay aware of time differences regardless of your local display format.
Time Format and Productivity Tools
Consistent time formatting enhances productivity, especially when scheduling meetings, setting deadlines, or tracking work hours. Many professionals use complementary tools alongside Windows time settings to manage their schedules effectively. For instance, timer tools help track specific tasks regardless of your preferred time display format.
When working with international teams or managing projects across time zones, maintaining clear time format standards prevents confusion. Document your team’s preferred time format in shared resources and communication guidelines. This simple step significantly reduces scheduling errors and missed appointments.
Regional Considerations and International Standards
The ISO 8601 international standard recommends the 24-hour format (HH:mm:ss) for unambiguous time representation. This format is mandatory in many international industries including aviation, military, healthcare, and scientific research. If your work involves international coordination, adopting this standard ensures clarity across borders and languages.
Different regions also vary in their date format preferences, which often accompany time format changes. While the United States typically uses MM/DD/YYYY, most other countries prefer DD/MM/YYYY or YYYY-MM-DD. When changing time formats, consider adjusting date formats simultaneously to maintain consistency across your system.
Advanced Configuration for Power Users
Windows Registry contains time format settings for users comfortable with advanced system modifications. However, Registry editing carries risks and should only be attempted by experienced users with proper backups. The safer approach involves using Group Policy Editor on Windows Pro and Enterprise editions, which provides structured access to regional settings without directly modifying Registry values.
System administrators managing multiple computers can deploy standardized time format settings across networks using Group Policy Objects (GPO). This ensures consistency across organizational devices and reduces individual configuration needs. For detailed guidance on advanced Windows configurations, visit the CheckDateTime.com guides section for additional resources.
Maintaining Your Time Format Preferences
Windows updates occasionally reset customized settings to defaults. After major updates, verify your time format preferences remain intact. Creating a simple checklist of your customization choices helps quickly restore settings if needed. Document your preferred short time, long time, short date, and long date formats for easy reference.
Regular backups of your system include regional settings, but explicitly noting your preferences ensures you can quickly reconfigure new devices or fresh Windows installations. This practice proves especially valuable for professionals who maintain multiple computers or frequently set up new systems.
Time Format Comparison Table
| Format Type | Example | Common Usage | Windows Notation |
|---|---|---|---|
| 12-hour with seconds | 3:45:30 PM | United States, Canada | h:mm:ss tt |
| 12-hour without seconds | 3:45 PM | Casual timekeeping | h:mm tt |
| 24-hour with seconds | 15:45:30 | Military, aviation, healthcare | HH:mm:ss |
| 24-hour without seconds | 15:45 | Europe, Asia, scientific | HH:mm |
| ISO 8601 Standard | 15:45:30 | International communications | HH:mm:ss |
FAQ – Change Time Format in Windows 11
How do I change the time format in Windows 11?
You can change it by right-clicking the clock on the taskbar, selecting Adjust date and time, then clicking Change the date and time format. From there, choose your preferred Short time format.
Can I switch between 12-hour and 24-hour time in Windows 11?
Yes. In the time format settings, select a Short time option that uses AM/PM for 12-hour format, or one without AM/PM for 24-hour format.
Do I need to restart Windows after changing the time format?
No. Windows applies the new time format automatically, and no restart is required.
Why don’t I see the format options right away?
If you don’t see them, make sure you click Change the date and time format from Date & Time settings. You can also access advanced options via Region → Additional settings.
Will changing the time format affect my apps?
Most apps will automatically follow your Windows time format, though a few third-party apps may use their own settings.
Conclusion
Changing time format in Windows is a straightforward process that significantly improves user experience by aligning system displays with personal preferences or professional requirements. Whether you use the modern Settings app or the classic Control Panel approach, Windows provides flexible options for customizing how time appears throughout your system. Understanding time format notation enables precise customization, while awareness of regional standards helps you make informed choices for international collaboration. By following this guide, you can confidently adjust your Windows time format to match your specific needs, ensuring clarity and consistency in all your time-related tasks.